Build an application by using a Druid connection pool, MySQL Connector/J, and seekdb
This topic describes how to build an application by using a Druid connection pool, MySQL Connector/J, and seekdb. The application implements basic database operations, including table creation, data insertion, data updating, data deletion, data query, and table deletion.
Download the druid-mysql-client sample project
Prerequisites
-
You have installed seekdb.
-
You have installed JDK 1.8 and Maven.
-
You have installed Eclipse.
infoThe tool used to run the code in this topic is Eclipse IDE for Java Developers 2022-03. You can also use other tools that you prefer.
Procedure
The following procedure describes how to compile and run the project in the Windows environment by using Eclipse IDE for Java Developers 2022-03. If you use other operating systems or compilers, the procedure may vary.
- Import the
druid-mysql-clientproject into Eclipse. - Obtain the seekdb URL.
- Modify the database connection information in the
druid-mysql-clientproject. - Run the
druid-mysql-clientproject.
Step 1: Import the druid-mysql-client project into Eclipse
-
Open Eclipse and choose File > Open Projects from File System.
-
In the dialog box that appears, click Directory to select the project directory and then click Finish.
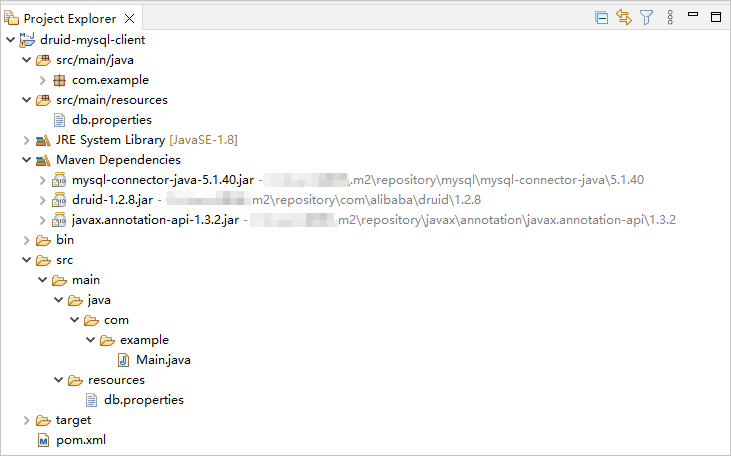
infoWhen you import a Maven project into Eclipse, it automatically detects the
pom.xmlfile in the project, downloads the required dependency libraries based on the described dependencies in the file, and adds them to the project.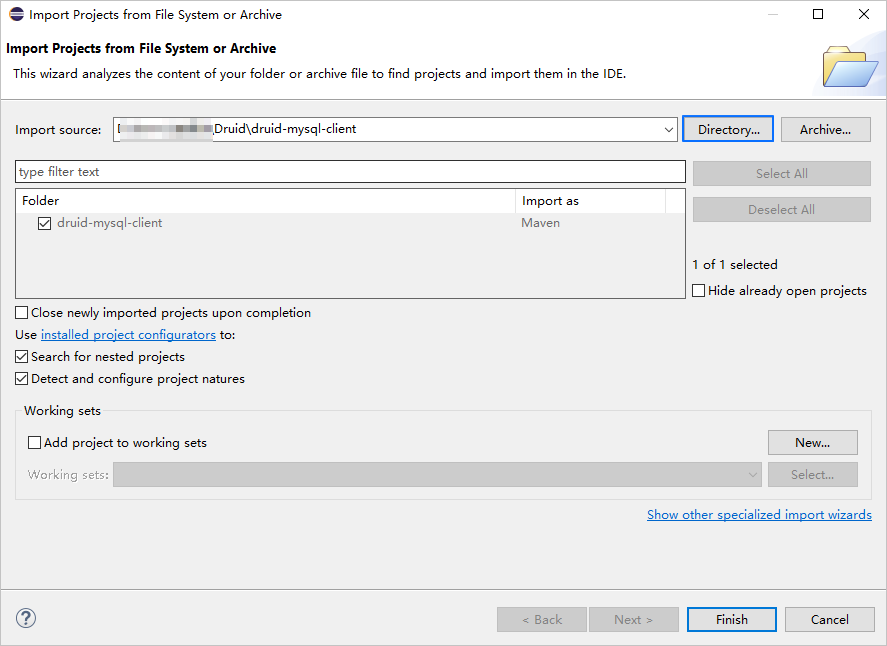
-
View the project.
Step 2: Obtain the seekdb URL
-
Contact the seekdb deployment personnel or administrator to obtain the corresponding database connection string.
Example:
mysql -hxxx.xxx.xxx.xxx -P2881 -uroot -p****** -DtestFor more information about the connection string, see Connect to seekdb by using a MySQL client.
-
Fill in the URL with the seekdb connection string information.
jdbc:mysql://$host:$port/$database_name?user=$user_name&password=$password&useSSL=falseParameter description:
$host: the IP address for connecting to seekdb. Replace it with the actual IP address. You can also use the local IP address or 127.0.0.1.$port: the port for connecting to seekdb. Replace it with the actual port. The default port is 2881, which can be customized when you deploy seekdb.$database_name: the name of the database to be accessed.user_name: the connection account. Format:username.password: the password for the account.
For more information about the MySQL Connector/J connection properties, see Configuration Properties.
Example:
jdbc:mysql://xxx.xxx.xxx.xxx:2881/test?user=root&password=******&useSSL=false
Step 3: Modify the database connection information in the druid-mysql-client project
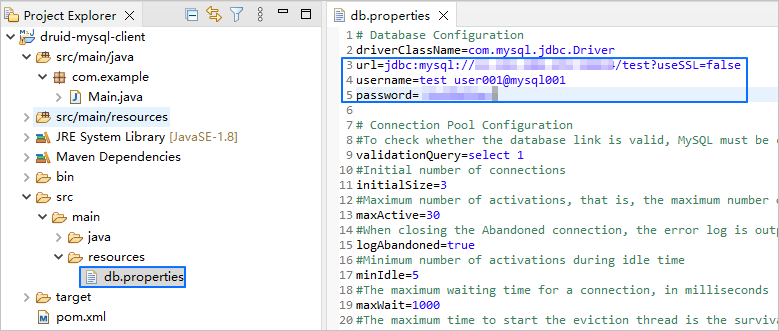
Modify the database connection information in the druid-mysql-client/src/main/resources/db.properties file based on the information obtained in Step 2: Obtain the seekdb URL.
Example:
- The IP address of seekdb is
xxx.xxx.xxx.xxx. - The access port is 2881.
- The name of the database to be accessed is
test. - The connection account is
root. - The password is
******.
Code:
...
url=jdbc:mysql://xxx.xxx.xxx.xxx:2881/test?useSSL=false
username=root
password=******
...
Step 4: Run the druid-mysql-client project
-
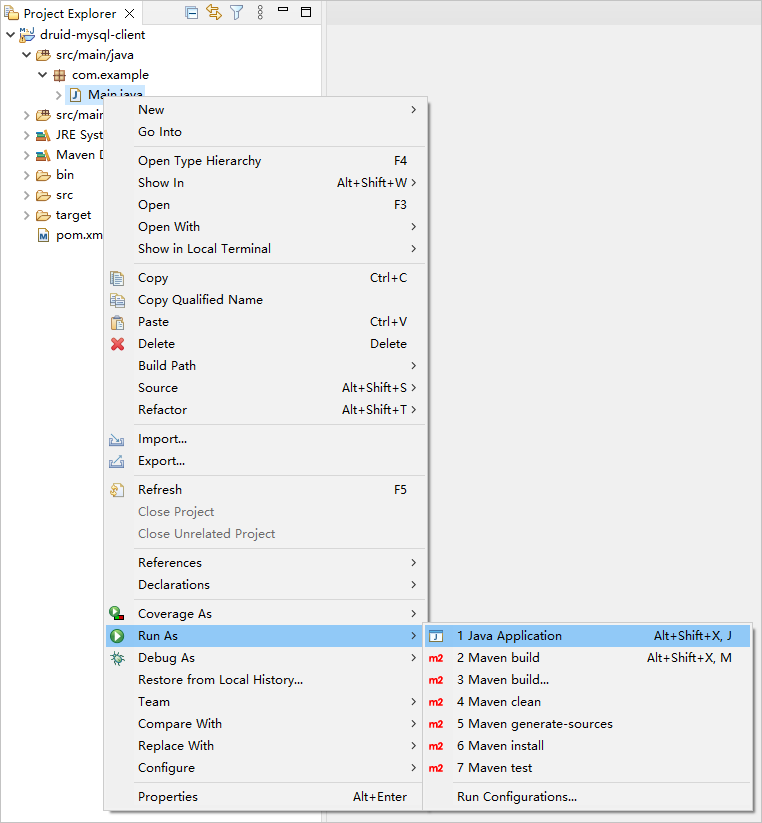
In the Project Explorer view, find and expand the druid-mysql-client/src/main/java directory.
-
Right-click the Main.java file and choose Run As > Java Application.
-
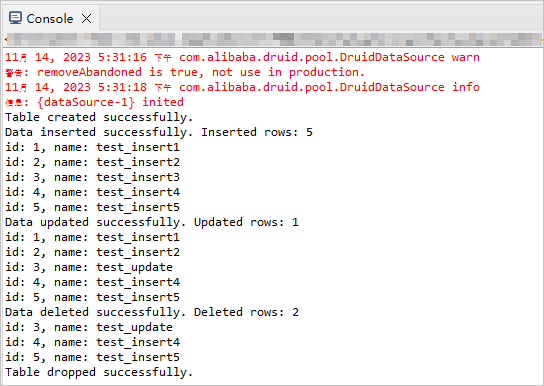
View the output in the Eclipse console window.
Project code
Click druid-mysql-client to download the project code, which is a compressed file named druid-mysql-client.zip.
After decompressing it, you will find a folder named druid-mysql-client. The directory structure is as follows:
druid-mysql-client
├── src
│   └── main
│       ├── java
│       │   └── com
│       │       └── example
│       │           └── Main.java
│       └── resources
│           └── db.properties
└── pom.xml
File description:
src: the root directory for source code.main: the main code directory, containing the core logic of the application.java: the directory for Java source code.com: the directory for Java package.example: the directory for the example project's package.Main.java: the main class program file, containing logic for creating tables, inserting, deleting, updating, and querying data.resources: the directory for resource files, including configuration files.db.properties: the configuration file for the connection pool, containing relevant database connection parameters.pom.xml: the configuration file for the Maven project, used to manage project dependencies and build settings.
Introduction to the pom.xml file
The pom.xml file is a configuration file for Maven projects. It defines project dependencies, plugins, and build rules. Maven is a Java project management tool that can automatically download dependencies, compile, and package projects.
The pom.xml file in this topic includes the following main sections:
-
File declaration statement.
This statement declares the file as an XML file using XML version
1.0and character encodingUTF-8.Sample code:
<?xml version="1.0" encoding="UTF-8"?> -
Configure the namespace and POM model version.
- Use
xmlnsto set the POM namespace tohttp://maven.apache.org/POM/4.0.0. - Use
xmlns:xsito set the XML namespace tohttp://www.w3.org/2001/XMLSchema-instance. - Use
xsi:schemaLocationto set the POM namespace tohttp://maven.apache.org/POM/4.0.0and the location of the POM XSD file tohttp://maven.apache.org/xsd/maven-4.0.0.xsd. - Use
<modelVersion>to set the POM model version to4.0.0.
Sample code:
<project xmlns="http://maven.apache.org/POM/4.0.0"
         xmlns:xsi="http://www.w3.org/2001/XMLSchema-instance"
         xsi:schemaLocation="http://maven.apache.org/POM/4.0.0 http://maven.apache.org/xsd/maven-4.0.0.xsd">
  <modelVersion>4.0.0</modelVersion>

 <!-- Other configurations -->

</project> - Use
-
Configure basic information.
- Use
<groupId>to set the project group tocom.example. - Use
<artifactId>to set the project name todruid-mysql-client. - Use
<version>to set the project version to1.0-SNAPSHOT.
Sample code:
    <groupId>com.example</groupId>
    <artifactId>druid-mysql-client</artifactId>
<version>1.0-SNAPSHOT</version> - Use
-
Configure the properties of the project source files.
Set the Maven compiler plugin to
maven-compiler-pluginand specify the source and target Java versions as 8. This means that the project's source code is written using Java 8 features, and the compiled bytecode will also be compatible with the Java 8 runtime environment. This configuration ensures that the project can correctly handle Java 8 syntax and features during compilation and runtime.infoJava 1.8 and Java 8 are different names for the same version.
Sample code:
    <build>
        <plugins>
            <plugin>
                <groupId>org.apache.maven.plugins</groupId>
                <artifactId>maven-compiler-plugin</artifactId>
                <configuration>
                    <source>8</source>
                    <target>8</target>
                </configuration>
            </plugin>
        </plugins>
</build> -
Configure the components that the project depends on.
-
Add the
mysql-connector-javadependency library for interacting with the database:- Use
<groupId>to set the dependency group tomysql. - Use
<artifactId>to set the dependency name tomysql-connector-java. - Use
<version>to set the dependency version to5.1.40.
Sample code:
        <dependency>
            <groupId>mysql</groupId>
            <artifactId>mysql-connector-java</artifactId>
            <version>5.1.40</version>
</dependency> - Use
-
Add the
druiddependency library:- Use
<groupId>to set the dependency group tocom.alibaba. - Use
<artifactId>to set the dependency name todruid. - Use
<version>to set the dependency version to1.2.8.
Sample code:
        <dependency>
            <groupId>com.alibaba</groupId>
            <artifactId>druid</artifactId>
            <version>1.2.8</version>
</dependency> - Use
-
db.properties
db.properties is a sample connection pool configuration file that contains the configuration properties of the connection pool. These properties include the database URL, username, password, and other optional parameters of the connection pool.
The db.properties file in this topic mainly includes the following sections:
-
Configure the database connection parameters.
-
Specify the class name of the database driver program as
com.mysql.jdbc.Driver. 2. Specify the database connection URL, including the host IP address, port number, and the schema to be accessed. 3. Specify the username of the database. 4. Specify the password of the database.
Sample code:
    driverClassName=com.mysql.jdbc.Driver
    url=jdbc:oceanbase://$host:$port/$database_name?useSSL=false
    username=$user_name
    password=$password
Parameter description:
$host: the IP address for connecting to seekdb. Replace it with the actual IP address. You can also use the local IP address or 127.0.0.1.$port: the port for connecting to seekdb. Replace it with the actual port number. The default value is 2881. You can customize it when you deploy seekdb.$database_name: the name of the database to be accessed.$user_name: the username for connecting to the database. Format:username.$password: the password for the account.
-
Configure other parameters of the connection pool.
-
Specify the SQL statement for validating the connection as
select 1. 2. Specify the initial number of connections of the connection pool as 3, which indicates that 3 initial connections will be created when the connection pool is started. 3. Specify the maximum number of active connections of the connection pool as 30, which indicates that the connection pool can have a maximum of 30 active connections at the same time. 4. Specify whether to print logs of abandoned connections astrue, which indicates that when abandoned connections are recycled, information will be output to the error log. In the test environment, you can set it totrue, and in the online environment, set it tofalseto avoid performance impact. 5. Specify the minimum number of idle connections of the connection pool as 5, which indicates that when the number of idle connections in the connection pool is less than 5, the connection pool will automatically create new connections. 6. Specify the maximum wait time for obtaining a connection as 1000 milliseconds, which indicates that if all connections in the connection pool are occupied and the wait time exceeds 1000 milliseconds, a timeout exception will be thrown when obtaining a connection. 7. Specify the minimum keep-alive time for idle connections as 300000 milliseconds, which indicates that if an idle connection is not used for 300000 milliseconds (5 minutes), it will be recycled. 8. Specify whether to recycle abandoned connections astrue, which indicates that when the connection exceeds the time defined byremoveAbandonedTimeout, it will be recycled. 9. Specify the timeout time for abandoned connections as 300 seconds, which indicates that connections not used for 300 seconds (5 minutes) will be recycled. 10. Specify the running interval of the idle connection recycling thread as 10000 milliseconds, which indicates that the idle connection recycling thread will execute the idle connection recycling operation every 10000 milliseconds (10 seconds). 11. Specify whether to validate the availability of the connection when obtaining it asfalse. Setting it tofalsecan improve performance, but may result in obtaining an unavailable connection. 12. Specify whether to validate the availability of the connection when returning it asfalse. Setting it tofalsecan improve performance, but may result in returning an unavailable connection. 13. Specify whether to validate the connection when it is idle astrue. When set totrue, the connection pool will periodically executevalidationQueryto validate the availability of the connection. 14. Specify whether to enable the keep-alive feature for long connections asfalse. Setting it tofalseindicates that the keep-alive feature for long connections is disabled. 15. Specify the idle time threshold for the connection as 60000 milliseconds, which indicates that if the idle time of the connection exceeds the threshold of 60000 milliseconds (1 minute), the keep-alive mechanism will detect the connection to ensure its availability. If the connection has any operations within the threshold time, the idle time will be recalculated.
Sample code:
    validationQuery=select 1
    initialSize=3
    maxActive=30
    logAbandoned=true
    minIdle=5
    maxWait=1000
    minEvictableIdleTimeMillis=300000
    removeAbandoned=true
    removeAbandonedTimeout=300
    timeBetweenEvictionRunsMillis=10000
    testOnBorrow=false
    testOnReturn=false
    testWhileIdle=true
    keepAlive=false
    keepAliveBetweenTimeMillis=60000
The specific configuration parameters depend on the project requirements and the characteristics of the database. We recommend that you adjust and configure the parameters based on your actual situation.
Common configuration parameters of the Druid connection pool:
| Parameter | Description |
|---|---|
| url | The URL for connecting to the database, which contains information about the database type, host name, port number, and database name. |
| username | The username for connecting to the database. |
| password | The password for connecting to the database. |
| driverClassName | The name of the database driver class. If you do not explicitly configure the driverClassName parameter, the Druid connection pool automatically identifies the database type (dbType) based on the url parameter and selects the corresponding driverClassName. This automatic identification mechanism reduces the workload of configuration and simplifies the configuration process. However, if the url parameter cannot be correctly parsed or if a non-standard database driver class is required, you must explicitly configure the driverClassName parameter to ensure that the correct driver class is loaded. |
| initialSize | The number of connections to be created when the connection pool is initialized. When the application starts, the connection pool creates the specified number of connections and stores them in the connection pool. |
| maxActive | The maximum number of active connections in the connection pool. When the number of active connections in the connection pool reaches the maximum value, subsequent connection requests will wait until a connection is released. |
| maxIdle | The maximum number of idle connections in the connection pool (this parameter is deprecated). When the number of idle connections in the connection pool reaches the maximum value, the extra connections will be closed. |
| minIdle | The minimum number of idle connections in the connection pool. When the number of idle connections in the connection pool is less than the minimum value, the connection pool creates new connections. |
| maxWait | The maximum time to wait for a connection, in milliseconds. If this parameter is set to a positive value, the connection will be released after the specified time. |
| poolPreparedStatements | Specifies whether to enable the PreparedStatement cache (PSCache) mechanism. If you set this parameter to true, the PreparedStatement objects will be cached to improve performance. However, in this scenario, the memory usage of OBProxy may continuously increase. Therefore, you must configure and monitor the memory usage properly to avoid memory leaks or memory overflow. |
| validationQuery | The SQL query statement for validating connections. When a connection is taken from the connection pool, this query statement is executed to verify whether the connection is valid. |
| timeBetweenEvictionRunsMillis | The interval for the connection pool to detect idle connections, in milliseconds. If the idle time of a connection exceeds the value specified by timeBetweenEvictionRunsMillis, the connection will be closed. |
| minEvictableIdleTimeMillis | The minimum idle time of a connection in the connection pool, in milliseconds. If this parameter is set to a negative value, the connection will not be recycled. |
| testWhileIdle | Specifies whether to test a connection when it is idle. If you set this parameter to true, the validationQuery is executed when a connection is idle to verify whether the connection is valid. |
| testOnBorrow | Specifies whether to test a connection when it is borrowed. If you set this parameter to true, the validationQuery is executed when a connection is borrowed to verify whether the connection is valid. |
| testOnReturn | Specifies whether to test a connection when it is returned. If you set this parameter to true, the validationQuery is executed when a connection is returned to verify whether the connection is valid. |
| filters | The predefined filters in the connection pool. These filters can be used to preprocess and postprocess connections in a specific order to provide additional features and enhance the performance of the connection pool. Common filters include:
filters parameter, the connection pool applies these filters in the specified order. You can separate the names of multiple filters with commas, for example: filters=stat,wall,log4j. |
Main.java code introduction
The Main.java file is the main program of the sample program in this topic. This topic provides a sample program that shows how to interact with a database by using a data source, a connection object, and various database operation methods.
The Main.java file in this topic contains the following code:
-
Import the required classes and interfaces.
-
Declare the package name of the current code as
com.example. 2. Import theIOExceptionclass of Java, which is used to handle input and output exceptions. 3. Import theInputStreamclass of Java, which is used to obtain an input stream from a file or other source. 4. Import theConnectioninterface of Java, which is used to represent a connection to a database. 5. Import theResultSetinterface of Java, which is used to represent a dataset of query results from a database. 6. Import theSQLExceptionclass of Java, which is used to handle SQL exceptions. 7. Import theStatementinterface of Java, which is used to execute SQL statements. 8. Import thePreparedStatementinterface of Java, which is used to execute precompiled SQL statements. 9. Import thePropertiesclass of Java, which is used to handle property files. 10. Import theDataSourceinterface of Java, which is used to manage database connections. 11. Import theDruidDataSourceFactoryclass of Alibaba Druid connection pool, which is used to create a Druid data source.
Sample code:
    package com.example;

    import java.io.IOException;
    import java.io.InputStream;
    import java.sql.Connection;
    import java.sql.ResultSet;
    import java.sql.SQLException;
    import java.sql.Statement;
    import java.sql.PreparedStatement;
    import java.util.Properties;
    import javax.sql.DataSource;
    import com.alibaba.druid.pool.DruidDataSourceFactory;
- Create a
Mainclass and define themainmethod.
Define a Main class and a main method. The main method is used to demonstrate how to use a connection pool to perform a series of operations on a database. The steps are as follows:
-
Define a public class named
Mainas the entry point of the program. The class name must be consistent with the file name. 2. Define a public static methodmainas the entry point of the program, which accepts command-line arguments. 3. Use the exception handling mechanism to capture and handle exceptions that may occur. 4. Call theloadPropertiesFilemethod to load a property file and return aPropertiesobject. 5. Call thecreateDataSource()method to create a data source object based on the configuration in the property file. 6. Use thetry-with-resourcesstatement to obtain a database connection and automatically close the connection after it is no longer needed. -
Call the
createTable()method to create a table. 2. Call theinsertData()method to insert data. 3. Call theselectData()method to query data. 4. Call theupdateData()method to update data. 5. Call theselectData()method again to query the updated data. 6. Call thedeleteData()method to delete data. 7. Call theselectData()method again to query the data after deletion. 8. Call thedropTable()method to delete the table.
Sample code:
    public class Main {

public static void main(String[] args) {
            try {
                Properties properties = loadPropertiesFile();
                DataSource dataSource = createDataSource(properties);
                try (Connection conn = dataSource.getConnection()) {
                    // Create table
                    createTable(conn);
                    // Insert data
                    insertData(conn);
                    // Query data
                    selectData(conn);

// Update data
                    updateData(conn);
                    // Query the updated data
                    selectData(conn);

// Delete data
                    deleteData(conn);
                    // Query the data after deletion
                    selectData(conn);

// Drop table
                    dropTable(conn);
                }
            } catch (Exception e) {
                e.printStackTrace();
            }
        }

// Define a method for obtaining and using configuration information from the property file
        // Define a method for obtaining a data source object
        // Define a method for creating a table
        // Define a method for inserting data
        // Define a method for updating data
        // Define a method for deleting data
        // Define a method for querying data
        // Define a method for deleting a table
    }
- Define a method for obtaining and using configuration information from the property file.
Define a private static method loadPropertiesFile() that loads a property file and returns a Properties object. The steps are as follows:
- Define a private static method
loadPropertiesFile()that returns aPropertiesobject and declares that it may throw anIOExceptionexception. 2. Create aPropertiesobject to store key-value pairs from the property file. 3. Use thetry-with-resourcesstatement to obtain an input streamisfor the property filedb.propertiesby using a class loader. 4. Use theloadmethod to load the properties from the input stream to thepropertiesobject. 5. Return the loadedpropertiesobject.
Sample code:
        private static Properties loadPropertiesFile() throws IOException {
            Properties properties = new Properties();
            try (InputStream is = Main.class.getClassLoader().getResourceAsStream("db.properties")) {
                properties.load(is);
            }
            return properties;
        }
- Define a method for obtaining a data source object.
Define a private static method createDataSource() that creates a DataSource object based on the configuration in the property file to manage and obtain database connections. The steps are as follows:
- Define a private static method
createDataSource()that receives aPropertiesobject as a parameter and declares that it may throw anExceptionexception. 2. Call thecreateDataSource()method of theDruidDataSourceFactoryclass and pass in thepropertiesparameter to return aDataSourceobject.
Sample code:
        private static DataSource createDataSource(Properties properties) throws Exception {
            return DruidDataSourceFactory.createDataSource(properties);
        }
- Define a method for creating a table.
Define a private static method createTable() that creates a data table in the database. The steps are as follows:
- Define a private static method
createTable()that receives aConnectionobject as a parameter and declares that it may throw anSQLException. 2. Use thetry-with-resourcesstatement to create aStatementobjectstmtby calling thecreateStatement()method of the connection objectconn. 3. Define a string variablesqlto store the SQL statement for creating a table. 4. Use theexecuteUpdate()method to execute the SQL statement and create the data table. 5. Print a message indicating that the table was created successfully.
Sample code:
        private static void createTable(Connection conn) throws SQLException {
            try (Statement stmt = conn.createStatement()) {
                String sql = "CREATE TABLE test_druid (id INT, name VARCHAR(20))";
                stmt.executeUpdate(sql);
                System.out.println("Table created successfully.");
            }
        }
- Define a method for inserting data.
Define a private static method insertData() for inserting data into the database. The steps are as follows:
-
Define a private static method
insertData()that receives aConnectionobject as a parameter and declares that it may throw anSQLException. 2. Define a string variableinsertDataSqlto store the SQL statement for inserting data. 3. Define an integer variableinsertedRowswith an initial value of 0 to record the number of rows inserted. 4. Use thetry-with-resourcesstatement to create aPreparedStatementobjectinsertDataStmtby calling theprepareStatement()method of the connection objectconnwith the SQL statement for inserting data. 5. Use aforloop to iterate 5 times, representing the insertion of 5 data records. -
Use the
setInt()method to set the value of the first parameter to the loop variablei. 2. Use thesetString()method to set the value of the second parameter to the stringtest_insertconcatenated with the value of the loop variablei. 3. Use theexecuteUpdate()method to execute the SQL statement for inserting data and accumulate the number of affected rows to theinsertedRowsvariable. -
Print a message indicating that the data was inserted successfully and the total number of rows inserted. 7. Return the total number of rows inserted.
Sample code:
        private static int insertData(Connection conn) throws SQLException {
            String insertDataSql = "INSERT INTO test_druid (id, name) VALUES (?, ?)";
            int insertedRows = 0;
            try (PreparedStatement insertDataStmt = conn.prepareStatement(insertDataSql)) {
                for (int i = 1; i < 6; i++) {
                    insertDataStmt.setInt(1, i);
                    insertDataStmt.setString(2, "test_insert" + i);
                    insertedRows += insertDataStmt.executeUpdate();
                }
                System.out.println("Data inserted successfully. Inserted rows: " + insertedRows);
            }
            return insertedRows;
        }
- Define a method for updating data.
Define a private static method updateData() for updating data in the database. The steps are as follows:
- Define a private static method
updateData()that receives aConnectionobject as a parameter and declares that it may throw anSQLException. 2. Use thetry-with-resourcesstatement to create aPreparedStatementobjectpstmtby calling theprepareStatement()method of the connection objectconnwith the SQL statement for updating data. 3. Use thesetString()method to set the value of the first parameter to the stringtest_update. 4. Use thesetInt()method to set the value of the second parameter to the integer value 3. 5. Use theexecuteUpdate()method to execute the SQL statement for updating data and assign the number of affected rows to theupdatedRowsvariable. 6. Print a message indicating that the data was updated successfully and the total number of rows updated.
Sample code:
        private static void updateData(Connection conn) throws SQLException {
            try (PreparedStatement pstmt = conn.prepareStatement("UPDATE test_druid SET name = ? WHERE id = ?")) {
                pstmt.setString(1, "test_update");
                pstmt.setInt(2, 3);
                int updatedRows = pstmt.executeUpdate();
                System.out.println("Data updated successfully. Updated rows: " + updatedRows);
            }
        }
- Define a method for deleting data.
Define a private static method deleteData() for deleting data from the database. The steps are as follows:
- Define a private static method
deleteData()that receives aConnectionobject as a parameter and declares that it may throw anSQLException. 2. Use thetry-with-resourcesstatement to create aPreparedStatementobjectpstmtby calling theprepareStatement()method of the connection objectconnwith the SQL statement for deleting data. 3. Use thesetInt()method to set the value of the first parameter to the integer value 3. 4. Use theexecuteUpdate()method to execute the SQL statement for deleting data and assign the number of affected rows to thedeletedRowsvariable. 5. Print a message indicating that the data was deleted successfully and the total number of rows deleted.
Sample code:
        private static void deleteData(Connection conn) throws SQLException {
            try (PreparedStatement pstmt = conn.prepareStatement("DELETE FROM test_druid WHERE id < ?")) {
                pstmt.setInt(1, 3);
                int deletedRows = pstmt.executeUpdate();
                System.out.println("Data deleted successfully. Deleted rows: " + deletedRows);
            }
        }
- Define a method for querying data.
Define a private static method selectData() for querying data from the database. The steps are as follows:
-
Define a private static method
selectData()that receives aConnectionobject as a parameter and declares that it may throw anSQLException. 2. Use thetry-with-resourcesstatement to create aStatementobjectstmtby calling thecreateStatement()method of the connection objectconn. 3. Define a string variablesqlto store the SQL statement for querying data. 4. Use theexecuteQuery()method to execute the SQL statement for querying data and assign the result set to theresultSetvariable. 5. Use awhileloop to traverse each row of the result set. -
Use the
getInt()method to obtain the integer value of theidfield in the current row and assign it to theidvariable. 2. Use thegetString()method to obtain the string value of thenamefield in the current row and assign it to thenamevariable. 3. Print the values of theidandnamefields in the current row.
Sample code:
        private static void selectData(Connection conn) throws SQLException {
            try (Statement stmt = conn.createStatement()) {
                String sql = "SELECT * FROM test_druid";
                ResultSet resultSet = stmt.executeQuery(sql);
                while (resultSet.next()) {
                    int id = resultSet.getInt("id");
                    String name = resultSet.getString("name");
                    System.out.println("id: " + id + ", name: " + name);
                }
            }
        }
- Define a method for deleting a table.
Define a private static method dropTable() for deleting a table from the database. The steps are as follows:
- Define a private static method
dropTable()that receives aConnectionobject as a parameter and declares that it may throw anSQLException. 2. Use thetry-with-resourcesstatement to create aStatementobjectstmtby calling thecreateStatement()method of the connection objectconn. 3. Define a string variablesqlto store the SQL statement for deleting a table. 4. Use theexecuteUpdate()method to execute the SQL statement for deleting a table. 5. Print a message indicating that the table was deleted successfully.
Sample code:
        private static void dropTable(Connection conn) throws SQLException {
            try (Statement stmt = conn.createStatement()) {
                String sql = "DROP TABLE test_druid";
                stmt.executeUpdate(sql);
                System.out.println("Table dropped successfully.");
            }
        }
Complete code
pom.xml
<?xml version="1.0" encoding="UTF-8"?>
<project xmlns="http://maven.apache.org/POM/4.0.0"
         xmlns:xsi="http://www.w3.org/2001/XMLSchema-instance"
         xsi:schemaLocation="http://maven.apache.org/POM/4.0.0 http://maven.apache.org/xsd/maven-4.0.0.xsd">
    <modelVersion>4.0.0</modelVersion>

    <groupId>com.example</groupId>
    <artifactId>druid-mysql-client</artifactId>
    <version>1.0-SNAPSHOT</version>
    <build>
        <plugins>
            <plugin>
                <groupId>org.apache.maven.plugins</groupId>
                <artifactId>maven-compiler-plugin</artifactId>
                <configuration>
                    <source>8</source>
                    <target>8</target>
                </configuration>
            </plugin>
        </plugins>
    </build>

    <dependencies>
        <dependency>
            <groupId>mysql</groupId>
            <artifactId>mysql-connector-java</artifactId>
            <version>5.1.40</version>
        </dependency>
        <dependency>
            <groupId>com.alibaba</groupId>
            <artifactId>druid</artifactId>
            <version>1.2.8</version>
        </dependency>
    </dependencies>
</project>
db.properties
# Database Configuration
driverClassName=com.mysql.jdbc.Driver
url=jdbc:mysql://$host:$port/$database_name?useSSL=false
username=$user_name
password=$password

# Connection Pool Configuration
#To check whether the database link is valid, MySQL must be configured to select 1; Oracle is select 1 from dual
validationQuery=select 1
#Initial number of connections
initialSize=3
#Maximum number of activations, that is, the maximum number of Connection pool
maxActive=30
#When closing the Abandoned connection, the error log is output. When the link is recycled, the console prints information. The test environment can add true, while the online environment is false. Will affect performance.
logAbandoned=true
#Minimum number of activations during idle time
minIdle=5
#The maximum waiting time for a connection, in milliseconds
maxWait=1000
#The maximum time to start the eviction thread is the survival time of a link (previous value: 25200000, the converted result of this time is: 2520000/1000/60/60=7 hours)
minEvictableIdleTimeMillis=300000
#Whether to recycle after exceeding the time limit
removeAbandoned=true
#Exceeding the time limit (in seconds), currently 5 minutes. If any business processing time exceeds 5 minutes, it can be adjusted appropriately.
removeAbandonedTimeout=300
# Run the idle connection collector Destroy thread every 10 seconds to detect the interval time between connections, based on the judgment of testWhileIdle
timeBetweenEvictionRunsMillis=10000
#When obtaining a link, not verifying its availability can affect performance.
testOnBorrow=false
#Check whether the link is available when returning the link to the Connection pool.
testOnReturn=false
#This configuration can be set to true, without affecting performance and ensuring security. The meaning is: Detect when applying for a connection. If the idle time is greater than timeBetweenEviceRunsMillis, execute validationQuery to check if the connection is valid.
testWhileIdle=true
#Default false, if configured as true, connection detection will be performed in the DestroyConnectionThread thread (timeBetweenEvaluation once)
keepAlive=false
#If keepAlive rule takes effect and the idle time of the connection exceeds it, the connection will only be detected
keepAliveBetweenTimeMillis=60000
Main.java
package com.example;

import java.io.IOException;
import java.io.InputStream;
import java.sql.Connection;
import java.sql.ResultSet;
import java.sql.SQLException;
import java.sql.Statement;
import java.sql.PreparedStatement;
import java.util.Properties;
import javax.sql.DataSource;
import com.alibaba.druid.pool.DruidDataSourceFactory;

public class Main {

    public static void main(String[] args) {
        try {
            Properties properties = loadPropertiesFile();
            DataSource dataSource = createDataSource(properties);
            try (Connection conn = dataSource.getConnection()) {
                // Create table
                createTable(conn);
                // Insert data
                insertData(conn);
                // Query data
                selectData(conn);

                // Update data
                updateData(conn);
                // Query the updated data
                selectData(conn);

                // Delete data
                deleteData(conn);
                // Query the data after deletion
                selectData(conn);

                // Drop table
                dropTable(conn);
            }
        } catch (Exception e) {
            e.printStackTrace();
        }
    }

    private static Properties loadPropertiesFile() throws IOException {
        Properties properties = new Properties();
        try (InputStream is = Main.class.getClassLoader().getResourceAsStream("db.properties")) {
            properties.load(is);
        }
        return properties;
    }

    private static DataSource createDataSource(Properties properties) throws Exception {
        return DruidDataSourceFactory.createDataSource(properties);
    }

    private static void createTable(Connection conn) throws SQLException {
        try (Statement stmt = conn.createStatement()) {
            String sql = "CREATE TABLE test_druid (id INT, name VARCHAR(20))";
            stmt.executeUpdate(sql);
            System.out.println("Table created successfully.");
        }
    }

    private static int insertData(Connection conn) throws SQLException {
        String insertDataSql = "INSERT INTO test_druid (id, name) VALUES (?, ?)";
        int insertedRows = 0;
        try (PreparedStatement insertDataStmt = conn.prepareStatement(insertDataSql)) {
            for (int i = 1; i < 6; i++) {
                insertDataStmt.setInt(1, i);
                insertDataStmt.setString(2, "test_insert" + i);
                insertedRows += insertDataStmt.executeUpdate();
            }
            System.out.println("Data inserted successfully. Inserted rows: " + insertedRows);
        }
        return insertedRows;
    }

    private static void updateData(Connection conn) throws SQLException {
        try (PreparedStatement pstmt = conn.prepareStatement("UPDATE test_druid SET name = ? WHERE id = ?")) {
            pstmt.setString(1, "test_update");
            pstmt.setInt(2, 3);
            int updatedRows = pstmt.executeUpdate();
            System.out.println("Data updated successfully. Updated rows: " + updatedRows);
        }
    }

    private static void deleteData(Connection conn) throws SQLException {
        try (PreparedStatement pstmt = conn.prepareStatement("DELETE FROM test_druid WHERE id < ?")) {
            pstmt.setInt(1, 3);
            int deletedRows = pstmt.executeUpdate();
            System.out.println("Data deleted successfully. Deleted rows: " + deletedRows);
        }
    }

    private static void selectData(Connection conn) throws SQLException {
        try (Statement stmt = conn.createStatement()) {
            String sql = "SELECT * FROM test_druid";
            ResultSet resultSet = stmt.executeQuery(sql);
            while (resultSet.next()) {
                int id = resultSet.getInt("id");
                String name = resultSet.getString("name");
                System.out.println("id: " + id + ", name: " + name);
            }
        }
    }

    private static void dropTable(Connection conn) throws SQLException {
        try (Statement stmt = conn.createStatement()) {
            String sql = "DROP TABLE test_druid";
            stmt.executeUpdate(sql);
            System.out.println("Table dropped successfully.");
        }
    }
}
References
For more information about MySQL Connector/J, see Overview of MySQL Connector/J.