HikariCP connection pool example with seekdb
This topic describes how to build an application by using HikariCP connection pool, MySQL Connector/J, and seekdb to perform basic database operations, including table creation, data insertion, data deletion, data updating, and data query.
Download the hikaricp-mysql-client sample project
Prerequisites
-
You have installed seekdb.
-
You have installed JDK 1.8 and Maven.
-
You have installed Eclipse.
infoThe code in this topic is run in Eclipse IDE for Java Developers 2022-03. You can use any tool that you prefer.
Procedure
The following procedure describes how to compile and run the hikaricp-mysql-client project in Eclipse IDE for Java Developers 2022-03 on Windows. If you are using a different operating system or compiler, the procedure may vary slightly.
- Import the
hikaricp-mysql-clientproject into Eclipse. - Obtain the seekdb URL.
- Modify the database connection information in the
hikaricp-mysql-clientproject. - Run the
hikaricp-mysql-clientproject.
Step 1: Import the hikaricp-mysql-client project into Eclipse
-
Open Eclipse and select File > Open Projects from File System from the menu bar.
-
In the dialog box that appears, click Directory to select the project directory, and then click Finish to complete the import.
infoWhen you import a Maven project into Eclipse, it automatically detects the
pom.xmlfile in the project, downloads the required dependency libraries based on the described dependencies, and adds them to the project.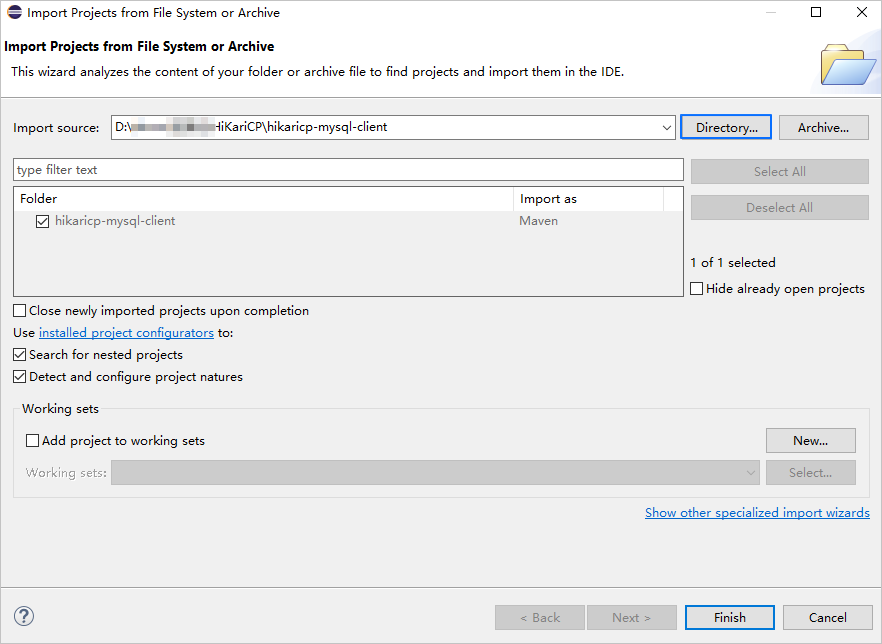
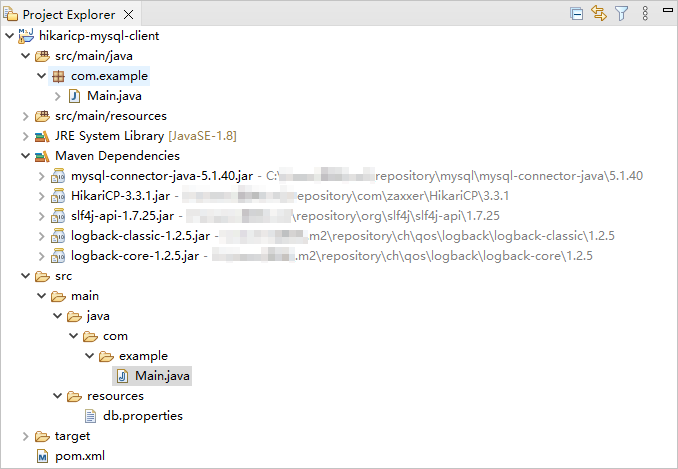
-
View the project.
Step 2: Obtain the seekdb URL
-
Contact the seekdb deployment personnel or administrator to obtain the database connection string.
Example:
mysql -hxxx.xxx.xxx.xxx -P2881 -uroot -p****** -DtestFor more information about the connection string, see Connect to seekdb by using a MySQL client.
-
Fill in the corresponding information in the URL based on the seekdb connection string.
jdbc:mysql://$host:$port/$database_name?user=$user_name&password=$password&useSSL=falseParameter description:
$host: the IP address for connecting to seekdb. Replace it with the actual IP address. You can also use the local IP address or 127.0.0.1.$port: the port for connecting to seekdb. Replace it with the actual port. The default port is 2881, which can be customized during seekdb deployment.$database_name: the name of the database to be accessed.user_name: the connection account. Format:username.password: the password for the account.
For more information about the MySQL Connector/J connection properties, see Configuration Properties.
Example:
jdbc:mysql://xxx.xxx.xxx.xxx:2881/test?user=test_user001@mysql001&password=******&useSSL=false
Step 3: Modify the database connection information in the hikaricp-mysql-client project
Modify the database connection information in the hikaricp-mysql-client/src/main/resources/db.properties file based on the information obtained in Step 2: Obtain the seekdb URL.
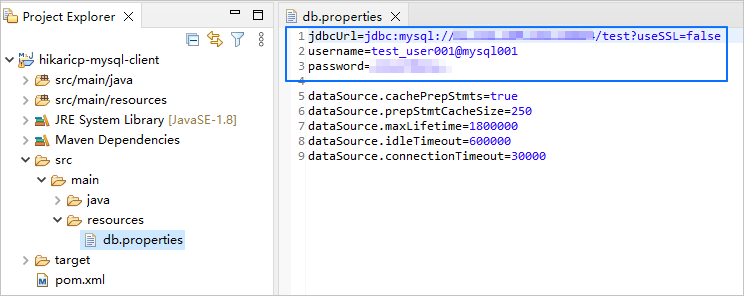
Example:
- The IP address of seekdb is
xxx.xxx.xxx.xxx. - The access port is 2881.
- The name of the database to be accessed is
test. - The connection account is
root. - The password is
******.
Code:
...
jdbcUrl=jdbc:mysql://xxx.xxx.xxx.xxx:2881/test?useSSL=false
username=root
password=******
...
Step 4: Run the hikaricp-mysql-client project
-
In the Project Explorer view, locate and expand the src/main/java directory.
-
Right-click the Main.java file and select Run As > Java Application.
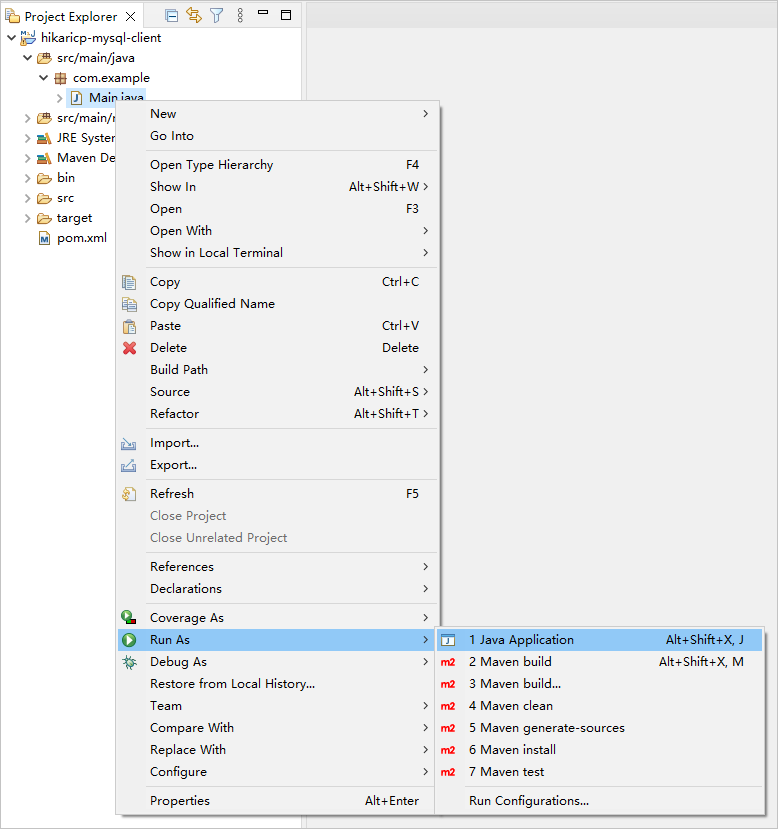
-
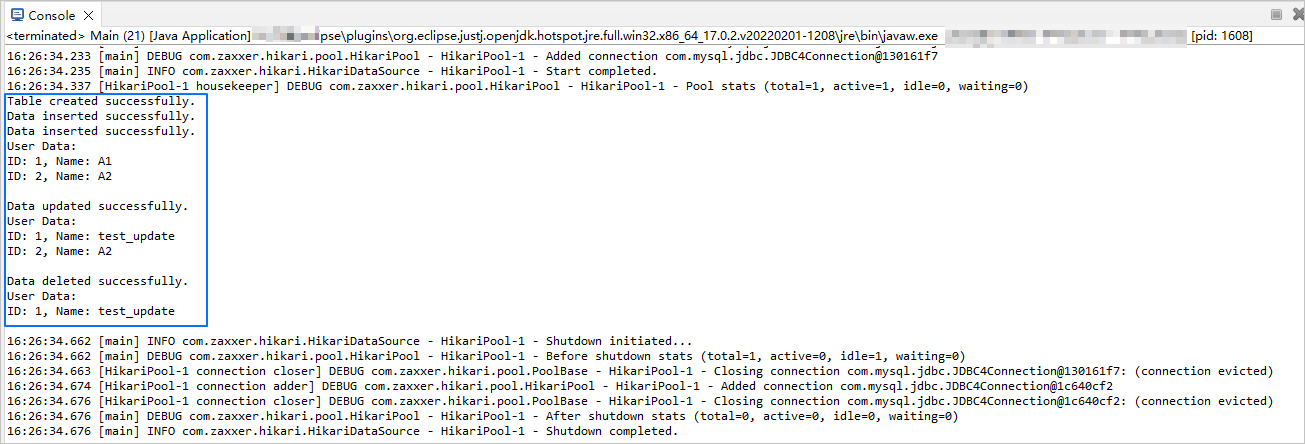
View the project logs and output results in the Eclipse console window.
-
You can also execute the following SQL statement in seekdb to view the results.
SELECT * FROM test.test_hikaricp;The returned result is as follows:
+------+-------------+
| id   | name        |
+------+-------------+
|    1 | test_update |
+------+-------------+
1 row in set
Project code
Click hikaricp-mysql-client to download the project code, which is a compressed file named hikaricp-mysql-client.zip.
After decompressing the file, you will find a folder named hikaricp-mysql-client. The directory structure is as follows:
hikaricp-mysql-client
├── src
│   └── main
│       ├── java
│       │   └── com
│       │       └── example
│       │           └── Main.java
│       └── resources
│           └── db.properties
└── pom.xml
File description:
src: the root directory for source code.main: the main code directory, containing the core logic of the application.java: the directory for Java source code.com: the directory for Java packages.example: the directory for packages in the sample project.Main.java: the main class file, containing logic for creating tables, inserting, deleting, updating, and querying data.resources: the directory for resource files, including configuration files.db.properties: the configuration file for the connection pool, containing parameters related to database connections.pom.xml: the configuration file for the Maven project, used to manage project dependencies and build settings.
Code introduction
The pom.xml file is the configuration file of a Maven project. It defines the dependencies, plugins, and build rules of the project. Maven is a Java project management tool that can automatically download dependencies, compile, and package projects.
The pom.xml file in this topic contains the following main sections:
-
The file declaration statement.
This statement declares that the file is an XML file using XML version
1.0and character encodingUTF-8.Sample code:
<?xml version="1.0" encoding="UTF-8"?> -
The POM namespace and model version.
- The
xmlnsattribute specifies the POM namespace ashttp://maven.apache.org/POM/4.0.0. - The
xmlns:xsiattribute specifies the XML namespace ashttp://www.w3.org/2001/XMLSchema-instance. - The
xsi:schemaLocationattribute specifies the POM namespace ashttp://maven.apache.org/POM/4.0.0and the location of the POM XSD file ashttp://maven.apache.org/xsd/maven-4.0.0.xsd. - The
<modelVersion>element specifies the POM model version used by the POM file as4.0.0.
Sample code:
<project xmlns="http://maven.apache.org/POM/4.0.0"
         xmlns:xsi="http://www.w3.org/2001/XMLSchema-instance"
         xsi:schemaLocation="http://maven.apache.org/POM/4.0.0 http://maven.apache.org/xsd/maven-4.0.0.xsd">
  <modelVersion>4.0.0</modelVersion>

 <!-- Other configurations -->

</project> - The
-
Basic information configuration.
- The
<groupId>element specifies the project's group ID ascom.example. - The
<artifactId>element specifies the project's artifact ID ashikaricp-mysql-client. - The
<version>element specifies the project's version as1.0-SNAPSHOT.
Sample code:
    <groupId>com.example</groupId>
    <artifactId>hikaricp-mysql-client</artifactId>
<version>1.0-SNAPSHOT</version> - The
-
Project source file properties configuration.
The Maven compiler plugin is specified as
maven-compiler-plugin, and the source and target Java versions are both set to 8. This means that the project's source code is written using Java 8 features, and the compiled bytecode will also be compatible with the Java 8 runtime environment. This configuration ensures that the project can correctly handle Java 8 syntax and features during compilation and runtime.infoJava 1.8 and Java 8 are different names for the same version.
Sample code:
    <build>
        <plugins>
            <plugin>
                <groupId>org.apache.maven.plugins</groupId>
                <artifactId>maven-compiler-plugin</artifactId>
                <configuration>
                    <source>8</source>
                    <target>8</target>
                </configuration>
            </plugin>
        </plugins>
</build> -
Project dependency component configuration.
-
Add the
mysql-connector-javadependency library for database interaction:- The
<groupId>element specifies the dependency's group ID asmysql. - The
<artifactId>element specifies the dependency's artifact ID asmysql-connector-java. - The
<version>element specifies the dependency's version as5.1.40.
Sample code:
        <dependency>
            <groupId>mysql</groupId>
            <artifactId>mysql-connector-java</artifactId>
            <version>5.1.40</version>
</dependency> - The
-
Add the
HikariCPdependency library for high-performance JDBC connection pooling:- The
<groupId>element specifies the dependency's group ID ascom.zaxxer. - The
<artifactId>element specifies the dependency's artifact ID asHikariCP. - The
<version>element specifies the dependency's version as3.3.1.
Sample code:
        <dependency>
            <groupId>com.zaxxer</groupId>
            <artifactId>HikariCP</artifactId>
            <version>3.3.1</version>
</dependency> - The
-
Add the
logback-classicdependency library for convenient logging and management:- The
<groupId>element specifies the dependency's group ID asch.qos.logback. - The
<artifactId>element specifies the dependency's artifact ID aslogback-classic. - The
<version>element specifies the dependency's version as1.2.5.
Sample code:
        <dependency>
            <groupId>ch.qos.logback</groupId>
            <artifactId>logback-classic</artifactId>
            <version>1.2.5</version>
</dependency> - The
-
Introduction to the db.properties file
db.properties is the connection pool configuration file in the example provided in this topic. It contains the configuration properties of the connection pool, including the database URL, username, password, and other optional parameters.
The code in the db.properties file in this topic mainly includes the following parts:
-
Configure the database connection parameters.
- Configure the database connection URL, including the host IP, port number, and the database to be accessed.
- Configure the database username.
- Configure the database password.
Sample code:
jdbcUrl=jdbc:mysql://$host:$port/$database_name?useSSL=false
username=$user_name
password=$password
Parameter description:
$host: the IP address for connecting to seekdb. Replace it with the actual IP address. You can also use the local IP address or 127.0.0.1.$port: the port for connecting to seekdb. Replace it with the actual port number. The default value is 2881. You can customize it when you deploy seekdb.$database_name: the name of the database to be accessed.$user_name: the username for the connection. Format:username.$password: the password for the account.
-
Configure other parameters of the connection pool.
- Enable the cache for precompiled SQL statements.
- Set the cache size of the precompiled SQL statements to 250.
- Set the maximum lifetime of a connection to 1800000 milliseconds (30 minutes). After this period, the connection will be closed.
- Set the idle timeout of a connection to 600000 milliseconds (10 minutes). After this period, the connection will be closed if it is idle.
- Set the timeout of a connection to 30000 milliseconds (30 seconds). If no connection is obtained within this period, an exception will be thrown.
Sample code:
dataSource.cachePrepStmts=true
dataSource.prepStmtCacheSize=250
dataSource.maxLifetime=1800000
dataSource.idleTimeout=600000
dataSource.connectionTimeout=30000
The specific configuration of parameters depends on the project requirements and the characteristics of the database. We recommend that you adjust and configure the parameters based on your actual situation. For more information about the HikariCP connection pool parameters, see Configuration.
Common basic parameters of HikariCP connection pools:
| Category | Parameter | Default value | Description |
|---|---|---|---|
| Required parameters | dataSourceClassName | N/A | The name of the DataSource class provided by the JDBC driver. Notice: dataSourceClassName is usually not explicitly configured because HikariCP can automatically detect and load the appropriate driver. |
| Required parameters | jdbcUrl | N/A | The URL for connecting to the database through JDBC. |
| Required parameters | username | N/A | The username for connecting to the database. |
| Required parameters | password | N/A | The password for connecting to the database. |
| Common optional parameters | autoCommit | true | Controls the default auto-commit behavior of the connections returned by the connection pool |
| Common optional parameters | connectionTimeout | 30000 | Controls the maximum waiting time for a client to obtain a connection from the connection pool. The unit is milliseconds. The default value is 30000 (30 seconds). The minimum acceptable connection timeout is 250 milliseconds. |
| Common optional parameters | idleTimeout | 600000 | Controls the maximum idle time of a connection in the pool. The unit is milliseconds. The default value is 600000 (10 minutes). This setting has the following limitations: It takes effect only when minimumIdle is less than maximumPoolSize.When the number of connections in the connection pool reaches minimumIdle, idle connections will not be recycled. Connections will only be recycled when the number of connections exceeds minimumIdle. |
| Common optional parameters | keepaliveTime | 0 | Controls the frequency of connection keepalive to prevent connections from being timed out by the database or network infrastructure. The unit is milliseconds. The default value is 0, indicating that connection keepalive is disabled. This value must be less than the value of the maxLifetime parameter. |
| Common optional parameters | maxLifetime | 1800000 | Controls the maximum lifetime of a connection in the connection pool. Used connections will not be automatically recycled. They will be removed from the connection pool only when they are closed. The unit is milliseconds. The default value is 1800000 (30 minutes). If you set maxLifetime to 0, it indicates that there is no maximum lifetime limit for connections in the connection pool, meaning the connections have an infinite lifetime. |
| Common optional parameters | connectionTestQuery | N/A | Executes a connection test query sent by the connection pool to the database. It is executed before obtaining a connection from the connection pool to verify whether the connection to the database is still valid. |
| Common optional parameters | minimumIdle | N/A | Controls the minimum number of idle connections to be maintained in the connection pool. If the number of idle connections is less than this value and the total number of connections in the connection pool is less than maximumPoolSize, HikariCP will try to add additional connections as quickly and efficiently as possible. By default, the value of the minimumIdle parameter is the same as that of the maximumPoolSize parameter. |
| Common optional parameters | maximumPoolSize | 10 | Controls the maximum size of the connection pool, including both idle and in-use connections. This value determines the maximum number of actual connections to the database backend. |
| Common optional parameters | poolName | N/A | The name of the user-defined connection pool. This name is mainly used for identifying the connection pool and its configuration in log records and the JMX management console. By default, a name will be automatically generated. |
Main.java code introduction
The Main.java file is part of the sample program, which demonstrates how to obtain a database connection using the HikariCP connection pool and perform a series of database operations, including table creation, data insertion, data deletion, data update, and data query, and print the query results.
The Main.java file in this topic contains the following parts:
-
Import the required classes and packages.
-
Define the package name of the current Java file as
com.example, which is used to organize and manage Java classes. 2. Import thejava.sql.Connectionclass, which is used to establish and manage connections to the database. 3. Import thejava.sql.PreparedStatementclass, which is used to execute precompiled SQL statements. 4. Import thejava.sql.ResultSetclass, which is used to process query result sets. 5. Import thejava.sql.SQLExceptionclass, which is used to handle SQL exceptions. 6. Import theHikariConfigclass of HikariCP, which is used to configure the HikariCP connection pool. 7. Import theHikariDataSourceclass of HikariCP, which is used to create and manage the HikariCP connection pool.
Code:
    package com.example;

    import java.sql.Connection;
    import java.sql.PreparedStatement;
    import java.sql.ResultSet;
    import java.sql.SQLException;
    import com.zaxxer.hikari.HikariConfig;
    import com.zaxxer.hikari.HikariDataSource;
- Define the class name and method.
Define a Main class, whose main method serves as the program entry. In the main method, read the db.properties file to configure the HikariCP connection pool and obtain a database connection. Then, call a series of methods to create a table, insert data, query data, update data, and delete data. If an SQLException occurs during the operation, the exception stack trace is printed. The specific steps are as follows:
- Define a public class named Main.
2. Define the entry method
mainof the Main class. 3. Create a HikariConfig object and configure it using the specifieddb.propertiesfile. 4. Create a HikariDataSource object and obtain a database connection in thetry-with-resourcesblock. 5. Call the method for creating a table and pass the obtained database connection object to create thetest_hikaricptable. 6. Call the method for inserting data and pass the obtained database connection object and data parameters to insert two rows of data,(1,'A1')and(2,'A2'). 7. Call the method for querying data and pass the obtained database connection object to check the data insertion status. 8. Call the method for updating data and pass the obtained database connection object and update parameters to update the value of thenamecolumn in the row withidas1totest_update. 9. Call the method for querying data and pass the obtained database connection object to check the data update status. 10. Call the method for deleting data and pass the obtained database connection object and delete parameters to delete the row withidas2. 11. Call the method for querying data and pass the obtained database connection object to check the data deletion status. 12. If anSQLExceptionoccurs in thetryblock, print the exception stack trace. 13. Define methods for creating a table, inserting data, querying data, updating data, and deleting data.
Code:
    public class Main {
        public static void main(String[] args) {
            try {
                HikariConfig config = new HikariConfig("/db.properties");
                try (HikariDataSource dataSource = new HikariDataSource(config);
                    Connection conn = dataSource.getConnection()) {
                    createTable(conn);

insertData(conn, 1, "A1");
                    insertData(conn, 2, "A2");

selectData(conn);

updateData(conn, "test_update", 1);
                    selectData(conn);

deleteData(conn, 2);
                    selectData(conn);
                }
            } catch (SQLException e) {
                e.printStackTrace();
            }
        }

// Define the method for creating a table.
        // Define the method for inserting data.
        // Define the method for querying data.
        // Define the method for updating data.
        // Define the method for deleting data.
    }
- Define the method for creating a table.
Define a private static method createTable to create a table named test_hikaricp in the database, which contains id and name columns. The specific steps are as follows:
- Define a private static method
createTablethat accepts a Connection object as a parameter and declares that it may throw anSQLException. 2. Define an SQL statement string to create a table namedtest_hikaricpwithid(data typeINT) andname(data typeVARCHAR(50)) columns. 3. Use the connection objectconnto create a precompiled SQL statement objectpstmtand use it in thetry-with-resourcesblock. 4. Execute the SQL statement to create thetest_hikaricptable. 5. Output a message to the console indicating that the table was created successfully.
Code:
        private static void createTable(Connection conn) throws SQLException {
            String sql = "CREATE TABLE IF NOT EXISTS test_hikaricp (id INT, name VARCHAR(50))";
            try (PreparedStatement pstmt = conn.prepareStatement(sql)) {
                pstmt.executeUpdate();
                System.out.println("Table created successfully.");
            }
        }
- Define the method for inserting data.
Define a private static method insertData to insert data into the test_hikaricp table in the database. The specific steps are as follows:
- Define a private static method
insertDatathat accepts a Connection object, an integeridparameter, and a stringnameparameter, and declares that it may throw anSQLException. 2. Define an SQL statement string to insert data into thetest_hikaricptable, includingidandnamecolumns. 3. Use the connection objectconnto create a precompiled SQL statement objectpstmtand use it in thetry-with-resourcesblock. 4. Set the value of the first parameter?in the SQL statement toid. 5. Set the value of the second parameter?in the SQL statement toname. 6. Execute the SQL statement to insert data into the table. 7. Output a message to the console indicating that the data was inserted successfully.
Code:
        private static void insertData(Connection conn, int id, String name) throws SQLException {
            String sql = "INSERT INTO test_hikaricp (id, name) VALUES (?, ?)";
            try (PreparedStatement pstmt = conn.prepareStatement(sql)) {
                pstmt.setInt(1, id);
                pstmt.setString(2, name);
                pstmt.executeUpdate();
                System.out.println("Data inserted successfully.");
            }
        }
- Define the method for querying data.
Define a private static method selectData to query data from the test_hikaricp table in the database. The specific steps are as follows:
- Define a private static method
selectDatathat accepts a Connection object as a parameter and declares that it may throw anSQLException. 2. Define a SQL statement string for querying all data from thetest_hikaricptable. 3. Use theconnconnection object to create a precompiled SQL statement objectpstmt, and use this object within atry-with-resourcesblock. Execute the SQL query by calling theexecuteQuery()method and return the result set objectrs. 4. Print a message to the console indicating that user data is being printed. 5. Traverse the query result set, use thenext()method to check if there is another row of data in the result set, and enter the loop if there is. 6. Retrieve the value of theidcolumn from the result set and assign it to the variableid. 7. Retrieve the value of thenamecolumn from the result set and assign it to the variablename. 8. Print theidandnamevalues of each row to the console. 9. Print an empty line to the console.
Here is the code:
        private static void selectData(Connection conn) throws SQLException {
            String sql = "SELECT * FROM test_hikaricp";
            try (PreparedStatement pstmt = conn.prepareStatement(sql);
                ResultSet rs = pstmt.executeQuery()) {
                System.out.println("User Data:");
                while (rs.next()) {
                    int id = rs.getInt("id");
                    String name = rs.getString("name");
                    System.out.println("ID: " + id + ", Name: " + name);
                }
                System.out.println();
            }
        }
- Define a method for updating data.
Define a private static method updateData for updating data in the test_hikaricp table in the database. The specific steps are as follows:
- Define a private static method
updateDatathat accepts a Connection object, a string-typenameparameter, and an integer-typeidparameter, and declares that it may throw anSQLException. 2. Define a SQL statement string for updating data in thetest_hikaricptable, setting the value of thenamecolumn to the specifiednamewhere the value of theidcolumn equals the specifiedid. 3. Use theconnconnection object to create a precompiled SQL statement objectpstmt, and use this object within atry-with-resourcesblock. 4. Set the value of the first parameter?in the SQL statement toname. 5. Set the value of the second parameter?in the SQL statement toid. 6. Execute the SQL statement to update the data in the table. 7. Print a message to the console indicating that the data update was successful.
Here is the code:
        private static void updateData(Connection conn, String name, int id) throws SQLException {
            String sql = "UPDATE test_hikaricp SET name = ? WHERE id = ?";
            try (PreparedStatement pstmt = conn.prepareStatement(sql)) {
                pstmt.setString(1, name);
                pstmt.setInt(2, id);
                pstmt.executeUpdate();
                System.out.println("Data updated successfully.");
            }
        }
- Define a method for deleting data.
Define a private static method deleteData for deleting data from the test_hikaricp table in the database that meets the specified conditions. The specific steps are as follows:
- Define a private static method
deleteDatathat accepts a Connection object and an integer-typeidparameter, and declares that it may throw anSQLException. 2. Define a SQL statement string for deleting data from thetest_hikaricptable where the value of theidcolumn equals the specifiedid. 3. Use theconnconnection object to create a precompiled SQL statement objectpstmt, and use this object within atry-with-resourcesblock. 4. Set the value of the first parameter?in the SQL statement toid. 5. Execute the SQL statement to delete data from the table that meets the conditions. 6. Print a message to the console indicating that the data deletion was successful.
Here is the code:
        private static void deleteData(Connection conn, int id) throws SQLException {
            String sql = "DELETE FROM test_hikaricp WHERE id = ?";
            try (PreparedStatement pstmt = conn.prepareStatement(sql)) {
                pstmt.setInt(1, id);
                pstmt.executeUpdate();
                System.out.println("Data deleted successfully.");
            }
        }
Complete code
pom.xml
<?xml version="1.0" encoding="UTF-8"?>
<project xmlns="http://maven.apache.org/POM/4.0.0"
         xmlns:xsi="http://www.w3.org/2001/XMLSchema-instance"
         xsi:schemaLocation="http://maven.apache.org/POM/4.0.0 http://maven.apache.org/xsd/maven-4.0.0.xsd">
    <modelVersion>4.0.0</modelVersion>

    <groupId>com.oceanbase</groupId>
    <artifactId>hikaricp-mysql-client</artifactId>
    <version>1.0-SNAPSHOT</version>
    <build>
        <plugins>
            <plugin>
                <groupId>org.apache.maven.plugins</groupId>
                <artifactId>maven-compiler-plugin</artifactId>
                <configuration>
                    <source>8</source>
                    <target>8</target>
                </configuration>
            </plugin>
        </plugins>
    </build>

    <dependencies>
        <dependency>
            <groupId>mysql</groupId>
            <artifactId>mysql-connector-java</artifactId>
            <version>5.1.40</version>
        </dependency>
        <dependency>
            <groupId>com.zaxxer</groupId>
            <artifactId>HikariCP</artifactId>
            <version>3.3.1</version>
        </dependency>
        <dependency>
            <groupId>ch.qos.logback</groupId>
            <artifactId>logback-classic</artifactId>
            <version>1.2.5</version>
        </dependency>
    </dependencies>
</project>
db.properties
jdbcUrl=jdbc:mysql://$host:$port/$database_name?useSSL=false
username=$user_name
password=$password

dataSource.cachePrepStmts=true
dataSource.prepStmtCacheSize=250
dataSource.maxLifetime=1800000
dataSource.idleTimeout=600000
dataSource.connectionTimeout=30000
Main.java
package com.example;

import java.sql.Connection;
import java.sql.PreparedStatement;
import java.sql.ResultSet;
import java.sql.SQLException;
import com.zaxxer.hikari.HikariConfig;
import com.zaxxer.hikari.HikariDataSource;

public class Main {
    public static void main(String[] args) {
        try {
            HikariConfig config = new HikariConfig("/db.properties");
            try (HikariDataSource dataSource = new HikariDataSource(config);
                 Connection conn = dataSource.getConnection()) {
                createTable(conn);

                insertData(conn, 1, "A1");
                insertData(conn, 2, "A2");

                selectData(conn);

                updateData(conn, "test_update", 1);
                selectData(conn);

                deleteData(conn, 2);
                selectData(conn);
            }
        } catch (SQLException e) {
            e.printStackTrace();
        }
    }

    private static void createTable(Connection conn) throws SQLException {
        String sql = "CREATE TABLE IF NOT EXISTS test_hikaricp (id INT, name VARCHAR(50))";
        try (PreparedStatement pstmt = conn.prepareStatement(sql)) {
            pstmt.executeUpdate();
            System.out.println("Table created successfully.");
        }
    }

    private static void insertData(Connection conn, int id, String name) throws SQLException {
        String sql = "INSERT INTO test_hikaricp (id, name) VALUES (?, ?)";
        try (PreparedStatement pstmt = conn.prepareStatement(sql)) {
            pstmt.setInt(1, id);
            pstmt.setString(2, name);
            pstmt.executeUpdate();
            System.out.println("Data inserted successfully.");
        }
    }

    private static void selectData(Connection conn) throws SQLException {
        String sql = "SELECT * FROM test_hikaricp";
        try (PreparedStatement pstmt = conn.prepareStatement(sql);
             ResultSet rs = pstmt.executeQuery()) {
            System.out.println("User Data:");
            while (rs.next()) {
                int id = rs.getInt("id");
                String name = rs.getString("name");
                System.out.println("ID: " + id + ", Name: " + name);
            }
            System.out.println();
        }
    }

    private static void updateData(Connection conn, String name, int id) throws SQLException {
        String sql = "UPDATE test_hikaricp SET name = ? WHERE id = ?";
        try (PreparedStatement pstmt = conn.prepareStatement(sql)) {
            pstmt.setString(1, name);
            pstmt.setInt(2, id);
            pstmt.executeUpdate();
            System.out.println("Data updated successfully.");
        }
    }

    private static void deleteData(Connection conn, int id) throws SQLException {
        String sql = "DELETE FROM test_hikaricp WHERE id = ?";
        try (PreparedStatement pstmt = conn.prepareStatement(sql)) {
            pstmt.setInt(1, id);
            pstmt.executeUpdate();
            System.out.println("Data deleted successfully.");
        }
    }
}
References
- For more information about MySQL Connector/J, see Overview of MySQL Connector/J.
- For more information about using HikariCP connection pools, see HikariCP.